Showing posts with label Pinterest Attempts. Show all posts

feeling a little freaky {Pumpkin Spice Latte Bread Recipe}


It's that time of year again...Halloween!  Who doesn't love a bit of scary mixed with all you can eat candy?  It wouldn't be a holiday of the Bento Bloggers and Friends didn't do a blog hop...so here it is in all it's fearsome glory!  Click the button below to head on over to One Crafty Thing when you're done eyeballing my lunch.


This lunch contains an awesome recipe for Crock Pot Pumpkin bread from Wanna Bite blog.   I found the recipe on Pinterest, of course. It's moist and delicious and I don't think I will ever make pumpkin bread any other way now. If you're feeling a little adventurous, try dumping in two packets of Starbucks VIA instant coffee for a Pumpkin Spice Latte Bread...I use Italian Roast.  It's delicious (and caffeinated to boot!)

Here's the recipe for the kids without the coffee:

Crockpot Pumpkin Bread 

Ingredients
  • ½ cup of oil
  • ½ cup of sugar
  • ½ cup of packed brown sugar
  • 2 eggs (beaten)
  • 1 15oz can of pumpkin
  • 1½ cup of flour (sifted)
  • ¼ tsp. of salt
  • ½ tsp. of cinnamon
  • ½ tsp. of nutmeg
  • 1 tsp. of baking soda
Instructions
  1. Blend the oil and both of the sugars into a large bowl.
  2. Then, stir in the beaten eggs and canned pumpkin. Add the remaining dry ingredients and mix thoroughly.
  3. Pour the batter into a greased or oiled bread pan. (I used a canola oil spray that worked just fine.
  4. Now add two cups of water to your crockpot and place the pan into a crock pot.
  5. Cover the top of the crockpot with eight-ten paper towels. This is to trap condensation and keep the bread from becoming mushy.
  6. Place the crock pot lid on top of the crockpot (I tried to make sure the paper towels were trapped around the lid so they didn’t slip) and bake on high 2½ to 3 hours.

Since I have two very different children at two different stages in life, I had to make a lunch without all the Halloween flair for the 7th grader. She gets the same lunch, no fun and not tomatoes because she doesn't like tomatoes. 


And here's some close ups of the fun lunch:  I got the skeleton flair at Publix and the witch and hand on Amazon. Check out the links below to get some of your own. 


If you are interested in any of the products I use, click the affiliate links below, please! Anytime you purchase through one of my links, regardless of what you purchase, I get a small percentage of the sale. It's how lunchy gets paid! Thanks!


feeling a little crafty...baseball wreath {tutorial}


Finally!! A Pinterest win!  This baseball wreath was cheap and really easy to make...actually only took about twenty minutes from start to finish. While I know there are plenty of tutorials on Pinterest, I'm just going to add one to the heap.

The original pin and tutorial that I used can be found HERE.

You will need the following:

⚾A hanger (this is one from the dry cleaners, cheap and flexible)

⚾12 old baseballs (I went to a used sporting goods store and got them for $1.50 each)

⚾Wire clippers and/or needle nose pliers

⚾A drill with a bit long enough to go all the way through the ball

⚾A workspace with something to clamp the balls down while you're drilling

⚾Ribbon of your choice (I used 5/8 inch from the craft store, red white and blue, of course)

The total cost of this project was $23.46.  If you've got old baseballs and ribbon lying around, then it could be free...


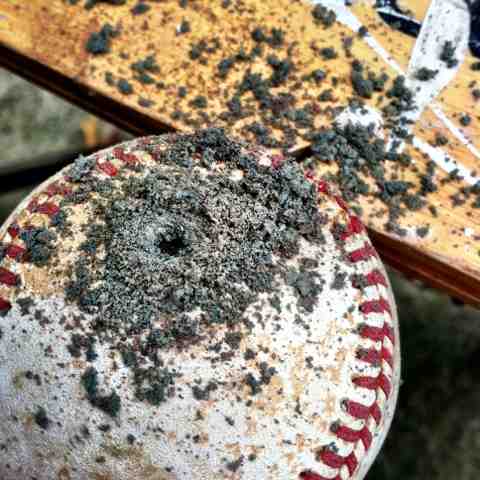
First, drill holes directly through the baseballs.

Tons of crap comes out the holes...sometimes it's pink inside, too. Don't tell your boys!
I drilled through then pulled the drill up and down a little to smooth out inside of the holes.

Straighten your hanger out using the wire clippers.  Clip the twisty ends off.
Using the wire clippers or needle nose pliers, make a loop at one end of the hanger.  Make it big enough to keep the balls on there and also so you can tie the wreath off when you're finished.

Thread the balls onto the straightened hanger.
Once all the balls are on the hanger, tie the ends together using your pliers. 

There's no need to make the hanger into a circle...the balls will form it on their own.

Tie your ribbon for hanging directly over the twisted together ends of the hanger.  This way, it's concealed.
Tie a bow on it.  It doesn't have to be perfect...unless you have to have it that way!

Hang it on your door...then sit in the yard and be proud of yourself. 

My family just happens to be fans of the Atlanta Braves...in fact, the Hubs just took the Wild child to a game last week, on a school night, which had a two hour rain delay.  Needless to say, they didn't get home until 12:45am. I still made that kid go to school.  Aren't I a mean mommy?

At the game, happy as can be!

And the aftermath: this was just before school the next morning. Notice she's still wearing her jersey!

And here's an old pic of my little Braves at their first game...where they found out that Santa is a HUGE Braves fan too


Related Posts Plugin for WordPress, Blogger...